Introduction to Docker

It has been 5 years since docker brought containers into the mainstream production environments that changed the way of application development and deployment. This link gives a quick overview on why companies are considering container technologies.  I can say that i lagged behind in exploring docker so i tried some hands-on with docker recently so i wanted to post a few articles on the things i tried. Docker has great documentation so i will try to keep my posts simple and concise and give those documentation links wherever applicable.

In this post, we will look at docker installation and ways to create docker images and containers. I used Ubuntu 17.10 (artful) VM with docker version 17.12.1-ce in Windows 10 based laptop.

Installation:

Docker is available in 2 editions Docker Community Edition (CE) and Docker Enterprise Edition (EE). Docker CE is for developers to explore containers and Docker EE is for enterprise development. Docker CE updates are available via two channels:

  • Stable, gives reliable updates every quarter
  • Edge, gives new features every month

To install Docker CE, do:

Old versions can be uninstalled using sudo apt-get remove docker docker-engine docker.io. Refer to documentation for more information on installation.

To verify docker installation, sudo docker -v.

Post Installation:

To avoid using sudo for running docker commands do following. Refer to this link for more information.

sudo usermod -aG docker svgonugu

HTTP Proxy:

Things are not same when you are behind proxy and can face a few issues while connecting to internet. To add proxy settings in Ubuntu, do

  • Go to Show Applications -> Network -> Network Proxy to update system wide proxy settings.

  • If still facing issue from command line, edit /etc/bash.bashrc to add following lines and reopen terminal. If it’s required for the current session, just issue the same commands at command prompt.

                   export http_proxy=http://hostname:port

                   export https_proxy=http://hostname:port

  • To make apt-get working, create a file named apt.conf in /etc/apt directory with following lines as root user (sudo su).

             Acquire::http::proxy “http://user:password@host:port/”;

             Acquire::https::proxy “http://user:password@host:port/”;

  • Docker daemon also needs to connect to internet to pull and push images. Do following to let docker to use your proxy. Create http-proxy.conf with following contents as root user(sudo su) and copy to directory /etc/systemd/system/docker.service.d. Refer to this link for more information.

                    [Service]
                    Environment=”HTTP_PROXY=http://host:port”
                    Environment=”HTTPS_PROXY=http://host:port”

  • Restart the docker daemon so that proxy settings will be effective.

                    systemctl daemon-reload
                    systemctl restart docker

Images and Containers:

Image is like an installation including everything like code, configuration, runtime etc and container is running instance of an image.

Use docker run to create a container from an image. For example, issue docker run hello-world  as shown below. Docker first checks for local availability of image and downloads from docker registry if the same is not found.

Do docker ps -a to see all containers and use docker ps to see only running containers. In above example, the container is created from hello-world image, prints the message and exits the container. Since this image is not available in local it gets downloaded as shown above.

Do docker images to see all local images.

Now let us start an interactive ubuntu container using docker run -ti ubuntu /bin/bash. This starts an interactive container and also downloads an ubuntu image if not present in local. The -i option makes container interactive and the -t option attaches it to terminal.

Observe hostname is nothing but the container id using docker ps.

To stop container, do docker stop <<containerid>>

To restart container, do docker start <<containerid>>

To attach the started container to terminal, do docker attach <<containerid>>

Creating an Image:

Each docker image will have a base image and can be built manually or using a file called Dockerfile. We will see both of these approaches using a sample nodejs application. Note that its always recommended to use official image provided by nodejs.

Manual Creation:

Do following to spin up a new container based on ubuntu image and install nodejs v8. -p option is used for port forwarding i.e. connecting to 8888 port (first argument in command) on docker host will forward the request to port 8888 in docker container. -v option mounts the file system so that container can access it. in my case, i have sample nodejs module in directory /home/siva/mywork (first argument in command) so i mounted this directory to access it in the container using same path.

docker run -ti -p 8888:8888 -v /home/siva/mywork:/home/siva/mywork ubuntu /bin/bash 

apt-get update    (update the index)

apt-get install -y curl  (install package related to curl)

curl -sL https://deb.nodesource.com/setup_8.x | bash –

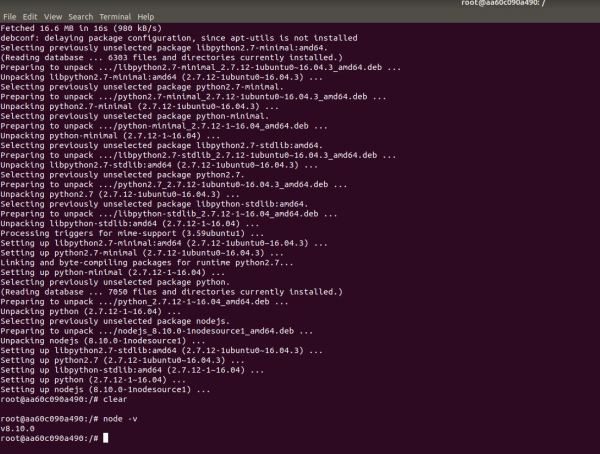
apt-get install -y nodejs  (install nodejs)

To verify nodejs installation, do node -v

Now copy nodejs module from docker host to container as below.

mkdir mywork;chmod -R 777 mywork

cp -r /home/siva/mywork/proj1 mywork

cd mywork/proj1

npm install (install all nodejs module dependencies)

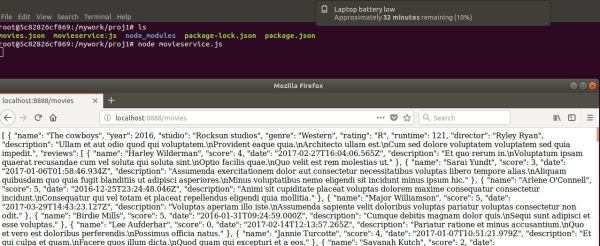
Run node movieservice.js and access service using browser url http://localhost:8888/movies.

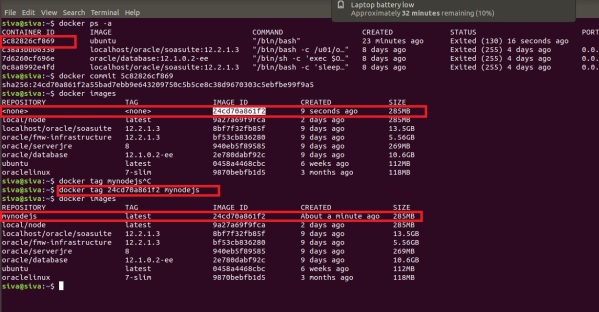
Now our nodejs application container is up and running. To create a docker image from this container, do

exit the container and find container id using docker ps -a.

docker commit <<containerid>>

docker images (find the newly created image id)

docker tag <> mynodejs (tag the image to meaningful name)

docker images

Using Docker file:

Creating docker images manually may not be possible always and also collaboration can become difficult with the above approach. So docker provides another way of building an image from file called Dockerfile that can have a set of instructions. All manual steps we did earlier can be incorporated in Dockerfile and build image from it.

The mynodejs image created above, does not start node server as soon as container starts. Observe that we started the node server manually by issuing node movieservice.js command. We will make it happen using a Dockerfile and build a new image from it. So create a file named Dockerfile with following instructions. I have taken this example to make a point that even images created by us can be a base image. Note that Dockerfile should always start with FROM instruction specifying base image. CMD instruction is used to specify command to be executed when new container is started..

#from the base image
FROM mynodejs
CMD exec node mywork/proj1/movieservice.js

To build image from this Dockerfile, Do:

docker build -t samplenodeappl .

Note that above command is to be executed after navigating to directory having Dockerfile.

nodeappl

Now instantiate new container using docker run -ti -p 8888:8888 samplenodeappl. Verify that node application is up and running using url http://localhost:8888/movies.
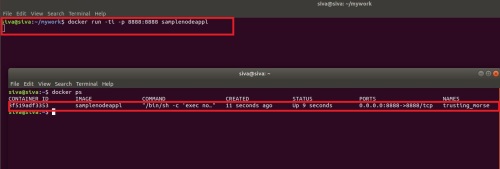
nodeport

We can publish this image to a public repository or can setup a private repository to share. To push the image to docker hub (public repository), do

Create an user at hub.docker.com.

docker login

docker tag <<imageid>> svgonugu/samplenodeappl

docker push svgonugu/samplenodeappl

Observe that image name should be tagged something like svgonugu/samplenodeappl containing your repository name.
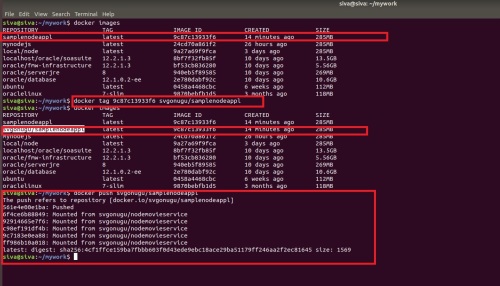
push

Login to docker hub to find this newly uploaded image.

hub

Images can be downloaded using pull command as highlighted above. Just to verify, we can delete the local image and pull it from repository.

Docker CLI Reference: https://docs.docker.com/edge/engine/reference/run/

Dockerfile  Reference: https://docs.docker.com/engine/reference/builder/#usage

NodeJS Installation: https://nodejs.org/en/download/package-manager/#debian-and-ubuntu-based-linux-distributions

VM Installation: https://wp.me/pEWnt-KN


Docker Containers for Oracle SOA Suite

In previous blog, we started with brief introduction of docker platform and also saw how to build images and run containers. In this blog, we will see how to setup an Oracle SOA Suite 12.2.1.3 environment with docker containers using Oracle official docker images. The README files available with official images have lot of information and one could easily create the docker images. So i just want to collate all this information here for quick reference.

I used Ubuntu 17.10 (artful) VM with docker version 17.12.1-ce in Windows 10 based laptop.

Installation:

Typical steps to be followed to install Oracle SOA Suite 12.2.1.3 in laptop:

  • Install JRE 8/JDK 8
  • Install the certified database.
  • Install Oracle SOA Suite/BPM Suite/OSB as per requirements.
  • Run RCU to create the required schemas
  • Configure the domain

In the world of docker the above steps translate to the following steps.

  • Build JRE 8 docker image
  • Build Oracle DB docker image
  • Build FMW infrastructure docker image
  • Build SOA Suite docker image
  • Start DB container
  • Start Admin Server container
  • Start Managed Server container

To start with, download official dockerfiles from https://github.com/oracle/docker-images and we use docker images related to OracleJava, OracleDatabase, OracleFMWInfrastructure and OracleSOASuite. Each of these folders have necessary scripts for installation but does not contain executables. Have all these folders copied into docker-images directory.

Build JRE 8 docker image:

  • Download server-jre-8u161-linux-x64.tar.gz  from link and copy into directory OracleJava/java-8.
  • Navigate to the above directory and run sh build.sh. We will observe the docker image oraclelinux:7-slim getting pulled from docker hub as the docker file contains instruction FROM oraclelinux:7-slim.
  • Once the build is complete we can see a new image available with tag oracle/serverjre:8.

  • Note that OracleJava folder also have docker files required to build JRE 9.

Build Oracle DB docker image:

  • Download files linuxamd64_12102_database_1of2.zip and linuxamd64_12102_database_2of2.zip from link and copy into directory OracleDatabase/dockerfiles/12.1.0.2. I had used 12.1.0.2 version though the latest is 12.2.0.1 because of smaller size.
  • Navigate to the directory OracleDatabase/dockerfiles and issue the following command. Option -v indicates the db version and the option -e represents Enterprise Edition.

                              sh buildDockerImage.sh -v 12.1.0.2 -e

  • Open OracleDatabase/dockerfiles/12.1.0.2/Dockerfile.ee to check the instructions that get executed during the image build. Observe oraclelinux:7-slim as the base image in this docker file.
  • Once the build is complete we can see a new image available with tag oracle/database:12.1.0.2-ee.

  • Note that OracleDatabase folder also have docker files required to build images based on versions 12.2.0.1 and 11.2.0.2 (XE).

Build FMWInfrastructure docker image:

  • Download file fmw_12.2.1.3.0_infrastructure_Disk1_1of1.zip from link and copy into directory OracleFMWInfrastructure/dockerfiles/12.2.1.3.
  • Navigate to the directory OracleFMWInfrastructure/dockerfiles and issue the following command. Option -v indicates the version.

                              sh buildDockerImage.sh -v 12.2.1.3

  • Open OracleFMWInfrastructure/dockerfiles/12.2.1.3/Dockerfile to check the instructions that get executed during the image build. Observe that oracle/serverjre:8 is the base image and this is the exact reason why we built jre image first.
  • Once the build is complete we can see a new image available with tag oracle/fmw-infrastructure:12.2.1.3.

  • Note that OracleFMWInfrastructure folder also have docker files required to build images based on versions 12.2.1.2.

Build SOA Suite docker image:

  • Download files fmw_12.2.1.3.0_soa.jar and fmw_12.2.1.3.0_osb.jar from link and copy into directory OracleSOASuite/dockerfiles/12.2.1.3. Note that these installers are not quick start installers.
  • Navigate to the directory OracleSOASuite/dockerfiles and issue the following command. Option -v indicates the version.

                            sh buildDockerImage.sh -v 12.2.1.3

  • Open OracleSOASuite/dockerfiles/12.2.1.3/Dockerfile to check the instructions that get executed during the image build. Observe that oracle/fmw-infrastructure:12.2.1.3 is the base image and this is the exact reason why we built that image first.
  • Once the build is complete we can see a new image available with tag localhost/oracle/soasuite:12.2.1.3.

  • Note that OracleSOASuite folder also have docker files required to build images based on versions 12.2.1.2.

By creating docker images for DB and SOA Suite, we are done with the installation and yet to configure DB instance, run RCU and configure SOA/OSB domain. Note that the image oracle/fmw-infrastructure has one pre-configured domain named base_domain.

We use docker-compose tool to create containers based on the above images. A sample yaml file docker-compose.yml is located in OracleSOASuite/samples directory.

Prerequisite:

  • Edit ../setenv.sh and set or modify the required env variables and do source ../setenv.sh. At minimum, we need to set DC_ORCL_SYSPWD, DC_ADMIN_PWD and DC_RCU_SCHPWD. Note that i had to set DC_HOSTNAME to ip address like 172.18.0.1 instead of hostname and localhost. Do this as first step before starting up any of the containers below.

Start DB container:

  • The docker-compose.yml file defines a service named soadb that can be used to create DB container. Modify this entry as below:

          soadb:
               image: oracle/database:12.1.0.2-ee
               ports:
                       – “${DC_ORCL_PORT}:1521”
                       – “${DC_ORCL_OEM_PORT}:5500”
               environment:
                      – ORACLE_SID=${DC_ORCL_SID}
                      – ORACLE_PDB=${DC_ORCL_PDB}
                      – ORACLE_PWD=${DC_ORCL_SYSPWD}
               container_name: soadb
               volumes:
                     – ${DC_ORCL_DBDATA}:/opt/oracle/oradata

  • Use command docker-compose up -d soadb to start the db container.

  • When DB container starts for first time, it configures the DB instance, TNS listener and creates some dummy password for SYS user. The logs can be seen using command docker logs -f soadb.

  • Execute docker exec <<container id>> /opt/oracle/setPassword.sh <<pwd>> to reset password for SYS user. Make sure that DB container is running before executing this command. The location of this script file can be derived from the instructions found in OracleDatabase/dockerfiles/12.1.0.2/Dockerfile.ee.
  • After the first time, to restart the container we can use either of the below commands. Make sure to run source ../setenv.sh always before using docker-compose commands.

docker-compose up -d soadb

docker start <<container id>>

  • Connect to db using command sqlplus sys/fusion@//172.18.0.1:1521/soadb as sysdba to make sure that DB is up and running.

  • Command docker stop can be used to stop the container.

Start Admin Server container:

  • docker-compose.yml file has soaas as one of the services which can be used to create the container. Use command docker-compose up -d soaas to start the admin server container.
  • When admin server container starts for first time, it runs RCU to create the required schemas by connecting to db container and also configures a new domain ,. The logs can be seen using command docker logs -f soaas.

  • After the first time, to restart the container we can use either of the below commands. Make sure to run source ../setenv.sh always before using docker-compose commands                 docker-compose up -d soaasdocker start <>
  • Verify you are able to access admin console using http://localhost:7001/console and observe that AdminServer is up and running. The password for admin console will be the value given for DC_ADMIN_PWD in setenv.sh.
  • In data sources, observe that prefix SOA01 is used for SOAINFRA, MDS and others which is the value given for DC_RCU_SOAPFX in setenv.sh.
  • Command docker stop can be used to stop the container.

Start Managed Server container:

Note that i had to use  minimum 6 GB RAM for my ubuntu VM to bring DB, Admin and managed server containers.

  • docker-compose.yml file has soams as one of the services which can be used to create the container. Use command docker-compose up -d soams to start the managed server container.

  • The logs generated in managed server container can be seen using command docker logs -f soams.

  • After the first time, to restart the container we can use either of the below commands. Make sure to run source ../setenv.sh always before using docker-compose commands

docker-compose up -d soams

docker start <<container id>>

  • Access admin console using http://localhost:7001/console and observe that soa_server1 is up and running and also we can see a soa_cluster configured.
  • Command docker stop can be used to stop the container.

Observations:

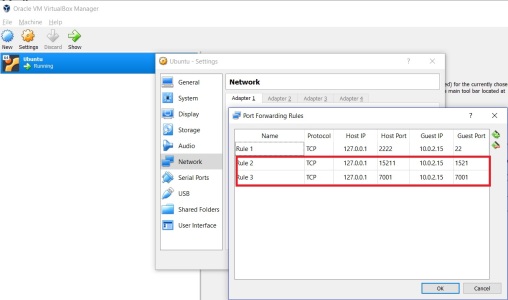
  • If we want to access the admin console from host OS, we need to configure the port forwarding rules for the VM as shown below.

  • When we are installing DB or SOA Suite in laptop the installation wizard guide us through the steps which makes life easier. But when when we want to use docker files to build images we need to come up with script for the installation and configuration. Typically developer may not have this much acquaintance with these kind of installation scripts and i feel admin help is required. I hope Oracle keep updating the their github repository with newer docker files and scripts whenever a new release is available.
  • I feel debugging containers is difficult and need to look more into this aspect. Initially, when i created VM i used 3 GB RAM  and with this RAM i was able to bring up DB and Admin server container. But when i starting managed server it got stuck and docker logs also did not help me to identify this issue. It was a complete guess by me and increased the RAM to 6 GB which made the things smoother.
  • The docker files uses yum tool which is not available in ubuntu that means, we may need to come up different docker files for different  linux distributions and for Windows OS.
  • The oracle official docker images for Java, DB and FMW Infrastrcture has oraclelinux as the base image. Does that mean oracle does not support in other linux distributions like ubuntu etc. I need to check on this and i welcome readers to let me know if anyone has information on this.

Oracle Virtual Box Techniques

Assumption: Using Oracle Virtual Box 5.2.6 for managing VMs.

Moving vdi image across disks:

Typically we might come across a need to move vdi files to different disks or drive for accommodating more memory needs. This can be done using the following steps. make sure that VM is in powered off mode.

First the vdi needs to be detached from the VM as shown below.

Go to File-> Virtual Media Manager and remove the vdi which we are planning to move.

Now move the vdi file to desired location. In my case, the initial location of the vdi is C:\Users\svgonugu\VirtualBox VMs\Ubuntu and i moved this vdi to D drive.

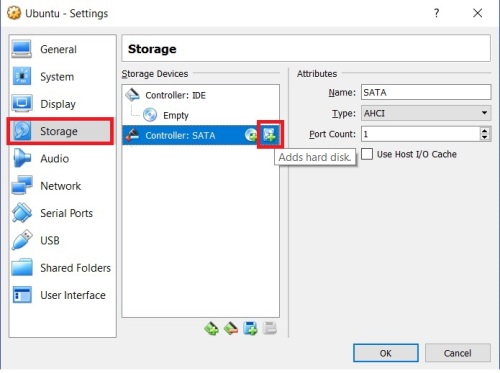
Again go to VM Settings -> Storage and click on add hard disk button high lighted below. Choose the above vdi which is moved to D drive and click OK. Now you should be restart the VM and proceed with your work with no issues.

Increasing the RAM used by VM:

There are so many instances where we might want to increase the RAM allocated to VM after the creation typically determined by the kind of usage. We can modify this in VM settings using the steps below. Make sure that VM is in powered off mode.

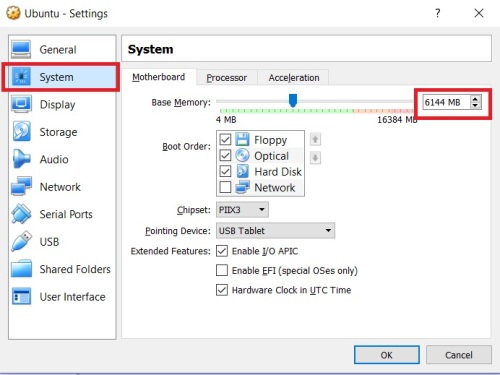
Navigate to System -> Motherboard and increase the base memory value as required and click OK.

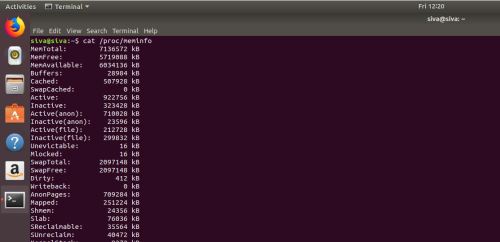
You can verify this memory settings by issuing cat /proc/meminfo or using free -m command.


Using BPM Java API – Add Attachment

In this post, will show you how to add task attachment using BPM java api.  For demonstration, i am taking simple string for input stream and same can be extended to any file.


public void addAttachment(String taskId, String fileName)
{
IWorkflowContext wfCtx = null;

try
{
String fileContents = "Using the sample string for attachment and this can be a file along with correct mime type";
InputStream is = null;

//creating the attachmenttype
AttachmentType attachmentType = new ObjectFactory().createAttachmentType();

//setting the attributes
attachmentType.setTaskId(taskId);
attachmentType.setName(fileName);
attachmentType.setDescription("From BPM Java API");
attachmentType.setMimeType("text/plain");

//setting the input stream
is = new ByteArrayInputStream(fileContents.getBytes());
attachmentType.setInputStream(is);

//get the admin workflow context
wfCtx = getAdminWorkflowContext();

//Task qryTask = getWfServiceClient().getTaskQueryService().getTaskDetailsById(wfCtx, taskId);
//getWfServiceClient().getTaskService().addAttachment(wfCtx, qryTask, attachmentType);

getWfServiceClient().getTaskService().addAttachment(wfCtx, taskId, attachmentType);
}
catch (Exception ex)
{
System.out.println("in addAttachment exception");
ex.printStackTrace();
}
}

The commented lines in the above code is another way of achieving the same. Pass root task id or any child task id for this method call. We can verify this attachment in WFATTACHMENT table as shown below.

select * from WFATTACHMENT where taskid = ‘c14791b7-7e43-475d-bb9a-003ab05aaf36’

Observations:

  • When roottaskid is used to add the attachments, the task form will show this attachment for all child tasks.
  • addAttachment API is inserting an entry into WFATTCHMENT table even when there is no task id passed.

  • The above behavior can be used in a scenario when we want to add task attachment task creation. To make this works, set the correlation id in attachment type like below and use the same correlation id during task creation.

attachmentType.setCorrelationId(correlationId);

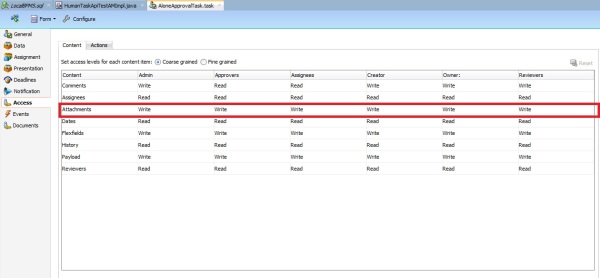
  • By default Admin, Approvers, Assignees, Reviewers, Owner and Creator can add attachments to a task which is configured in Access tab of human task as shown below. We will get an exception when unauthorized user trying to add the attachment as shown below.

<Nov 14, 2017, 2:45:36,118 PM IST> <Error> <oracle.soa.services.workflow.persistency> <BEA-000000> <<.> exception.code:30327
exception.type: ERROR
exception.severity: 2
exception.name: Current user does not have the ADD privilege on task attribute: ATTACHMENTS.
exception.description: Current user siva does not have ADD privilege for ATTACHMENTSon task with taskI
d b4ce32d1-d2e9-4f73-abc0-18c1447facf4.
exception.fix: Grant the ADD access for the current user/role. If the error persists, contact Oracle Support Services.

Using BPM Java API to manipulate Custom Attributes

In this post, will show you how to manipulate Custom attributes using BPM java API.

WFTASK table has the following columns along with columns used for public/private flex fields (Mapped attributes). Refer to this link for more information on mapped attributes.

CUSTOMATTRIBUTESTRING1 VARCHAR2(2000)
CUSTOMATTRIBUTESTRING2 VARCHAR2(2000)
CUSTOMATTRIBUTENUMBER1 NUMBER
CUSTOMATTRIBUTENUMBER2 NUMBER
CUSTOMATTRIBUTEDATE1 DATE
CUSTOMATTRIBUTEDATE2 DATE

BPM worklist also provides a search on these custom attributes as shown below. So when we are creating any custom worklist or in some other scenarios we can always populate these custom attributes using java apis.


public void updateCustomAttributes(String taskId, String customAttrStr1,String customAttrStr2)
{
IWorkflowContext wfCtx = null;

try
{
//creating the customattrtype
CustomAttributesType custAttrType = new ObjectFactory().createCustomAttributesType();
if(customAttrStr1 != null && !customAttrStr1.isEmpty())
{
custAttrType.setCustomAttributeString1(customAttrStr1);
}
if(customAttrStr2 != null && !customAttrStr2.isEmpty())
{
custAttrType.setCustomAttributeString2(customAttrStr2);
}

//get the admin workflow context
wfCtx = getAdminWorkflowContext();

Task qryTask = getWfServiceClient().getTaskQueryService().getTaskDetailsById(wfCtx, taskId);
qryTask.setCustomAttributes(custAttrType);

getWfServiceClient().getTaskService().updateTask(wfCtx, qryTask);
}
catch (Exception ex)
{
System.out.println("in updateCustomAttributes exception");
ex.printStackTrace();
}
}

To test this, send task id and values for custom attributes. We can use the following query to check the values.

select roottaskid, taskid, state,assignees,tasknumber,customattributestring1, customattributestring2
from wftask where roottaskid = ‘c1786a2b-f0a9-4058-aea2-43a0d40713eb’

Observations:

  • We can update these attribute values by passing roottaskid also.
  • When we update only one custom attribute its setting other values to null. To verify this, you can do first iteration by passing both attribute values and pass only one of these attribute values in second iteration of method calls.
  • When custom attributes are set during human task creation using apis, same set of values will be copied to roottaskid and all child tasks.

Using BPM Java API – Add Comments

In this post, we will see how to use BPM java api to add comments to human tasks.

Task Service provides different methods to add comments to a human task as shown below. I will show you how to make use of the method accepting CommentType as argument and using other methods is simple and straight forward.


import oracle.bpel.services.workflow.task.model.CommentType;
import oracle.bpel.services.workflow.task.model.ObjectFactory;
public void addCommentToTask(String taskId, String approverComments)
 { 
 IWorkflowContext wfCtx = null;
 
 try
 {
 //creating the commenttype
 CommentType comments = (new ObjectFactory()).createCommentType();
 comments.setComment(approverComments);
 
 //get the admin workflow context
 wfCtx = getAdminWorkflowContext();
 
 getWfServiceClient().getTaskService().addComment(wfCtx, taskId, comments); 
 }
 catch (Exception ex)
 {
 System.out.println("in addCommentToTask exception");
 ex.printStackTrace();
 } 
 }

Get the child taskid using roottaskid which has to be passed to the above method.

select roottaskid, taskid, state,assignees,tasknumber from wftask where roottaskid = ‘c033ea46-d632-4f4b-acf8-21b2cad709d8’

After executing the above method, we can check the comments using the following sql query.

select * from wfcomments where taskid = ‘c033ea46-d632-4f4b-acf8-21b2cad709d8’

Following piece of code demonstrates the approach to use Task object to add the comment.

 public void addCommentToTask(String taskId, String approverComments)
 { 
 IWorkflowContext wfCtx = null;
 
 try
 {
 //creating the commenttype
 CommentType comments = (new ObjectFactory()).createCommentType();
 comments.setComment(approverComments);
 
 //get the admin workflow context
 wfCtx = getAdminWorkflowContext();
 
 Task qryTask = getWfServiceClient().getTaskQueryService().getTaskDetailsById(wfCtx, taskId);
 getWfServiceClient().getTaskService().addComment(wfCtx, qryTask, comments); 
 }
 catch (Exception ex)
 {
 System.out.println("in addCommentToTask exception");
 ex.printStackTrace();
 } 
 }

Following is another approach of adding task comments using TaskService.updateTask method.


public void addCommentUsingTaskUpdate(String taskId, String approverComments)
{
IWorkflowContext wfCtx = null;

try
{
//creating the commenttype
CommentType comments = (new ObjectFactory()).createCommentType();
comments.setComment(approverComments);

//get the admin workflow context
wfCtx = getAdminWorkflowContext();

Task qryTask = getWfServiceClient().getTaskQueryService().getTaskDetailsById(wfCtx, taskId);
qryTask.addUserComment(comments);

getWfServiceClient().getTaskService().updateTask(wfCtx, qryTask);
}
catch (Exception ex)
{
System.out.println("in addCommentUsingTaskUpdate exception");
ex.printStackTrace();
}
}

Observations:

  • RootTaskId also can be used to add the comments.
  • By default, Admin, Assignees, Owner, Creator, Approvers and Reviewers will have the write access and this can be modified in Access tab of human task definition as shown below.

  • When a user attempt to add comments who does not have access, we will observe the following error in logs. We can reproduce this issue by turning off the write access for Approvers and Assignees in Access tab of human task. Also create the workflowContext using the user siva as siva is the assigness and approver here.

<Nov 14, 2017, 2:45:36,118 PM IST> <Error> <oracle.soa.services.workflow.persistency> <BEA-000000> <<.> exception.code:30327
exception.type: ERROR
exception.severity: 2
exception.name: Current user does not have the ADD privilege on task attribute: COMMENTS.
exception.description: Current user siva does not have ADD privilege for COMMENTS on task with taskI
d b4ce32d1-d2e9-4f73-abc0-18c1447facf4.
exception.fix: Grant the ADD access for the current user/role. If the error persists, contact Oracle Support Services.

Using BPM Java API – Withdraw Task

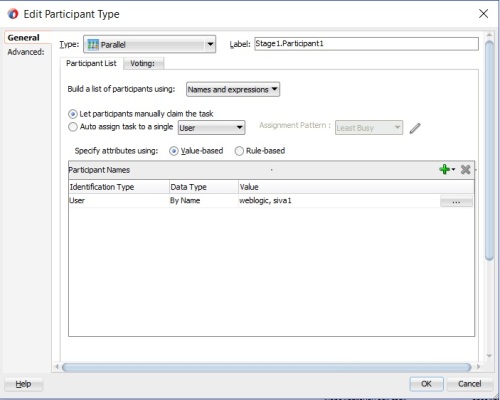
In this post, we will see how to withdraw a task using BPM Java API. I will use a human task having parallel participant for the demo purpose as shown below.

Following is piece of code to be used for withdrawing a human task.


public void withdrawTask(String taskId)
{
try
{
getWfServiceClient().getTaskService().withdrawTask(getAdminWorkflowContext(), taskId);
}
catch (Exception ex)
{
System.out.println("in withdrawTask exception");
ex.printStackTrace();
}
}

Note: we should destroy the workflow context when there is no need of the same which is not shown here.

Task Service has another variation of withdraw method where we can pass the task object as shown below.


public void withdrawTask(String taskId)
{
Task taskDetail = null;
IWorkflowContext wfCtx = null;

try
{
wfCtx = getAdminWorkflowContext();
taskDetail = getWfServiceClient().getTaskQueryService().getTaskDetailsById(wfCtx, taskId);
getWfServiceClient().getTaskService().withdrawTask(wfCtx, taskDetail);
}
catch (Exception ex)
{
System.out.println("in withdrawTask exception");
ex.printStackTrace();
}
}

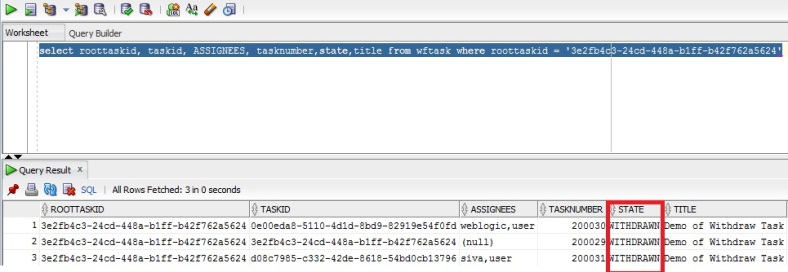
To test this code, create a task and query the WFTASK table using roottaskid as shown below. Observe that 2 child tasks are created for the roottaskid as we are using parallel participant with 2 approvers.

Now execute the above method by passing roottaskid. Query the WFTASK table again to verify all tasks are marked as WITHDRAWN as shown below.

Observations:

  • Using roottaskid for withdrawal will result into withdraw of all child tasks.
  • The above statement is true even if some of the child tasks are in approved/rejected state. In this case, using roottaskid will withdraw only the eligible child tasks.
  • The above statement is also true even if some of the child tasks are in ALERTED state. Typically tasks get into this state because BPM runtime unable to resolve the assignee. In the following screenshot, the user siva1 is not existing in my server hence the created task is in ALERTED state.

  • By default, Admin, Creator and Owner of the task can do withdraw of a task. we can see this information in Access tab of human task editor in jdeveloper. Observe the usage of Admin WorkflowContext in the above code.

We will get an error like below when unauthorized user try to withdraw the task. To reproduce the error, we can create the task using weblogic user and try to withdraw that user using another user who is not admin, creator and assignee.

<Nov 13, 2017, 6:19:03,842 PM IST> <Error> <oracle.soa.services.workflow.query> <BEA-000000> <<.> exception.code:30513
exception.type: ERROR
exception.severity: 2
exception.name: Insufficient privileges to access the task information for this task. The task must have either expired or assigned to another user.
exception.description: User siva cannot access the task information for task: fd1df834-04b3-4a5f-a7b5-8bbf83f8dc72.
exception.fix: Ensure that the user has been granted appropriate privileges to access the task information for this task or check on expiration and esclation policies.

  • We can get owner, creator and assignee details for a task using following sql query against soainfra schema.

select roottaskid, taskid, state,assignees,tasknumber,OWNERUSER,CREATOR from wftask where roottaskid = ‘fd1df834-04b3-4a5f-a7b5-8bbf83f8dc72’

Adding Code Source grants from EM

Often there is a need to interact with credential or policy store from java/ADF code which requires code source grants/system policies. Typically the application’s jazn file will have these values like the following.


<grant>
<grant>
<grantee>
<codesource>
<url>file:${domain.home}/servers/AdminServer/upload/HumanTaskApiTestService/-
</codesource>
</grantee>
<permissions>
<permission>
<class>oracle/security/jps/service/credstore/CredentialAccessPermission
<name>context=SYSTEM,mapName=admin/security,keyName=ADMIN_KEY</name>
<actions>read</actions>
</permission>
<permission>
<class>oracle.security.jps.service.policystore.PolicyStoreAccessPermission</class>
<name>context=APPLICATION,name=*</name>
<actions>*</actions>
</permission>
</permissions>
</grant>
</grant>

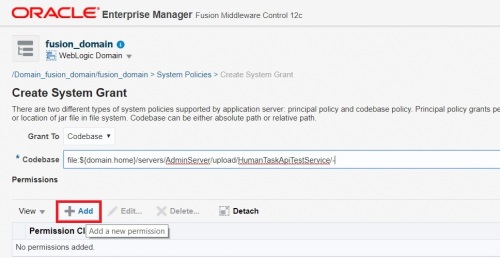
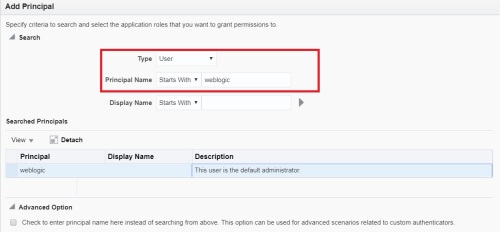
Use the following steps to provide these grants through EM Console.

Login to EM Console and navigate to Weblogic Domains -> <> -> Security (on right click) -> System Policies

create

grant

grant1.jpg

grant2

Using BPM Java API – WorkflowContext


Once the human task instance is created, we can perform several actions like:

  • Withdraw
  • Delegate
  • Update Task outcome
  • Add Attachment
  • Add Comments
  • Query Task details
  • etc..

If we observe these actions, we can guess that all users of the system should not be able to perform these actions and should be controlled through roles/privileges/permissions. So all these actions requires a user context to determine these permissions. BPM APIs accept this user context in form of WorkflowContext. WorkflowContext is a session object maintained by SOA server tied to an user.

How to create workflowcontext for a specific user?

Task Query service has authenticate method that accepts user credentials and returns a WorkflowContext as shown below.


public IWorkflowServiceClient getWfServiceClient()
 {
 IWorkflowServiceClient wfSvcClient = null;

wfSvcClient = WorkflowServiceClientFactory.getWorkflowServiceClient(WorkflowServiceClientFactory.REMOTE_CLIENT);
return wfSvcClient;
 }

public IWorkflowContext getUserWorkflowContext()
 {
 IWorkflowContext wfCtx = null;
 try
 {
 wfCtx = getWfServiceClient().getTaskQueryService().authenticate("weblogic", "weblogic1".toCharArray(), null);
 }
 catch(WorkflowException wex)
 {
 wex.printStackTrace();
 }

 return wfCtx; 
 }

How to create workflowcontext for a logged in user?

Same Task Query service is used to get workflowcontext for the logged in user as shown below. Make sure that your java/web application is security enabled.

 public IWorkflowContext getLoggedinUserWorkflowContext()
 {
 IWorkflowContext wfCtx = null;
 try
 {
 wfCtx = getWfServiceClient().getTaskQueryService().getWorkflowContextForAuthenticatedUser();
 }
 catch(WorkflowException wex)
 {
 wex.printStackTrace();
 }

 return wfCtx; 
 }

How to create workflowcontext on behalf of a user?

In some of the cases, password may not be available to get the user context but the task actions should be performed by this user. In those cases, we can create admin workflow context and use authenticateOnBehalfOf method of Task Query Service as shown below. Here the user weblogic is admin i.e. having BPMWorkflowAdmin role.

 public IWorkflowContext getOnbehalfOfUserWorkflowContext()
 {
 IWorkflowContext wfCtx = null;
 try
 {
 wfCtx = getWfServiceClient().getTaskQueryService().authenticate("weblogic", "weblogic1".toCharArray(), null);
 wfCtx = getWfServiceClient().getTaskQueryService().authenticateOnBehalfOf(wfCtx, "svgonugu");
 }
 catch(WorkflowException wex)
 {
 wex.printStackTrace();
 }
 return wfCtx; 
 }

How to assign BPMWorkflowAdmin role to an User?

  • Login to EM console and navigate to Weblogic Domain -> <<domainName>> -> Security -> Application Roles.
  • Search for BPMWorkflowAdmin role by choosing soa-infra as application stripe.

search.jpg

  • Click Edit to assign this role to an user and click Add. Note that weblogic user will have admin role by default so the screenshots presented here are only demo purpose.

add.jpg

  • Search for the user weblogic and click ok.

add1

add3.jpg

  • You will observe the following error when try to use authenticateOnBehalfOf method using the workflowcontext created using non-admin user.

ORABPEL-30509

exception.code:30509
exception.type: ERROR
exception.severity: 2
exception.name: Insufficient privileges to authenticate on behalf of another user.
exception.description: User siva cannot authenticate on behalf of user svgonugu without admin privil
eges.
exception.fix: Only users with admin privileges can authenticate on behalf of another user.

Do we have any timeout settings for WorkflowContext?

As mentioned earlier, Workflowcontext is a session object maintained by SOA/BPM server in heap memory. So creating more and more workflowcontexts might cause out of memory errors on the server. So whenever we are done with workflowcontext we should always destroy the context. Also BPM runtime has a default timeout of 60 min after which the workflowcontext object is destroyed. This timeout setting can be modified by navigating to Weblogic Domain -> <<domain name>> -> System MBean Browser -> Application Defined MBeans -> oracle.as.soainfra.config -> Workflow Config -> WorkflowServiceSesionTimeoutInMinutes as shown below.

timeout

If we use workflowcontext after timeout, we will get WorkflowException.

How to destroy WorkflowContext?


getWfServiceClient().getTaskQueryService().destroyWorkflowContext(wfCtx);

Using BPM Java API – wf_client_config.xml

In previous posts (post1 & post2), we have seen how to use SOAP and Remote clients to work with BPM Java APIs. One immediate problem we can see is using server urls in the code which makes deployment across environments difficult. In this post, we will see how to take care of this.

WorkflowServiceClientFactory class has different overloaded methods to get the client. When we don’t pass any properties like below, BPM run time will look for a file wf_client_config.xml in classpath of ear file.


private IWorkflowServiceClient getWfServiceClient()
{
IWorkflowServiceClient wfSvcClient = null;

wfSvcClient = WorkflowServiceClientFactory.getWorkflowServiceClient(WorkflowServiceClientFactory.REMOTE_CLIENT);
return wfSvcClient;
}

We can create wf_client_config.xml with the following contents having the server details and information pertaining to both SOAP and REMOTE clients. The file can be placed in a folder like conf under our project folder.


<?xml version="1.0" encoding="UTF-8"?>
<workflowServicesClientConfiguration xmlns="http://xmlns.oracle.com/bpel/services/client">
<server name="default" default="true">
<remoteClient>
<serverURL>t3://localhost:7005/soa-infra</serverURL>
<userName>weblogic</userName>
<password>weblogic1</password>
<initialContextFactory>weblogic.jndi.WLInitialContextFactory</initialContextFactory>
<participateInClientTransaction>false</participateInClientTransaction>
</remoteClient>
<soapClient>
<rootEndPointURL>http://localhost:7005</rootEndPointURL>
<identityPropagation mode="dynamic" type="saml">
<policy-references>
<policy-reference enabled="true" category="security"
uri="oracle/wss10_saml_token_client_policy"/>
</policy-references>
</identityPropagation>
</soapClient>
</server>
</workflowServicesClientConfiguration>

Include this file in the ear deployment profile using the below steps i.e. corresponding to ADF BC Service project. Create new file group APP-INF/classes as shown below.

app-inf

Add the contributor pointing to conf directory having wf_client_config.xml file.

app-inf1.jpg

Now filters section of APP-INF/classes group should be shown like below.

app-inf2.jpg

Deploy the ear file and re-test your webservice method.

During testing, if the following error is seen in the logs make sure that <?xml version = ‘1.0’ encoding = ‘UTF-8’?> is present as first line in wf_client_config.xml file.

[Exception [EclipseLink-25008] (Eclipse Persistence Services – 2.6.4.v20160829-44060b6): org.eclipse.persistence.exceptions.XMLMarshalException
Exception Description: A descriptor with default root element workflowServicesClientConfiguration was not found in the project]

Since the server details are externalized you can use tokens in wf_client_config.xml and replace them using actual server urls before deploying to specific environments.


Pages

Enter your email address to subscribe to this blog and receive notifications of new posts by email.

Join 379 other subscribers

Enter your email address to follow this blog and receive notifications of new posts by email.